Menu Close

Brand Guideline

The last part of the West Seattle Tool Library website was solidifying some branding. Like lots of small businesses, WSTL lacks a cohesive look. They also have many different versions of the logo. Once my version of the logo is approved, I will put it online with download links to the different logos and links to the Google typefaces.

brandguideline


Here are some of the previous logos:logo main-logo-vector

logo draftThis next week I will wrap up some other parts of the website, such as some of the illustrations for the tool genres and illustrations for the events. I will also change the photo of the t-shirt and make sure the woocommerce pages are styled.


Website tweaks and extra pages

This week was more about building out the other pages. Most of the information will be on the homepage, which is sort of acting like a landing page so the secondary pages are much smaller and more simple. Here is the Donation Page:

Screen Shot 2015-04-23 at 9.04.26 PM

Since they do not have the bandwidth to blog regularly, I am devoting the “blog” section to Events. This event page obviously needs work, something funky is happening with the code which is making it display wrong. I will also do more illustrations for these events so that they fit the rest of the illustration style.

Screen Shot 2015-04-23 at 9.04.40 PM

The page below is the Membership page. Though all memberships are donation based, there are recommended yearly donations. I decided to make them products using the WooCommerce plugin to make it easier to keep track of who has donated what.

Screen Shot 2015-04-23 at 9.04.57 PM

Wrapping up the Homepage

The homepage of the website is basically finished! Though I had originally planned on having the whole site finished, I am still proud of my progress. I also am going to continue this project next quarter so I kept that in mind.

I solved some complex issues, though. For instance, all of the functionalities and interactions people have with the website are thought out.

Such as:

  • Making a donation
  • Being able to sign up as a member online
  • Being able to buy a membership, even though giving money is by donation only
  • Being able to buy the West Seattle Tool Library shirt

I am excited to continue this project and make it live and usable for everyone who visits the Tool Library.

screencapture-wstoollibrary-org3-22

Stefan Fähler: Berlin-based artist/designer

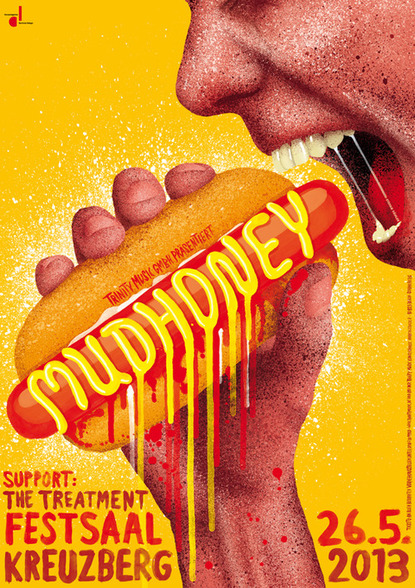
A poster that has been on one of my pinterest boards for a while is a Mudhoney gig poster, designed by Stefan Fähler. I recently came across it again while researching gig poster designers and it interested me in researching more of his work.

I originally found his work on Baubauhaus.com

I originally found his work on Baubauhaus.com

This poster has always stood out to me. First is its bright, radiating colors. The use of texture, in the splatter and painterly type is unexpected with a slight 80’s retro feeling. Also, I appreciate the slight disgusting-ness of it. The name Mudhoney already makes me associate it with a punk style and I have always enjoyed the contrast of that with the imagery invoked by the name “Mudhoney.” So adding a sloppy, mustard-soaked hotdog causes even more of a tantalizing disconnect.

Fähler started by designing visual campaigns for bigger companies but has since stepped away from the agency environment and became an independent artist. His work is very well summed up in an article on exberliner.com. It writes, “Embracing carnal behaviour and bodily fluids, he never forgets the cherry on top, the whimsy.” This is what I appreciate so much in his work. Disgusting but without being overtly disgusting, yet still whimsical. That is a difficult dichotomy to balance. That is why this poster stuck out to me.

Here is another gig poster for Death Grips (photo cred from his website).

sf_deathgrips_web
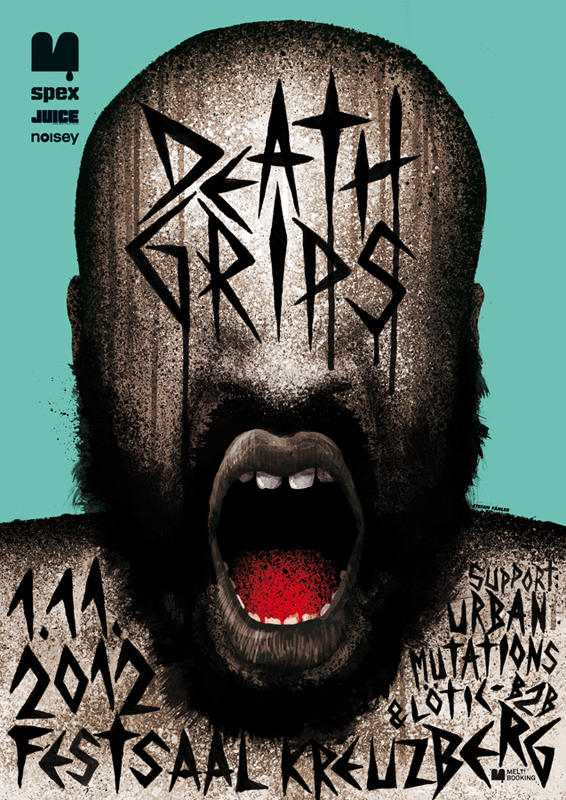
I marvel at how he treats his type so differently for each poster. He always well integrates it in unique and inventive ways. For instance, the “Death Grips” gig poster compared to this poster for a film premiere (also from his website).

sf_amanwithin

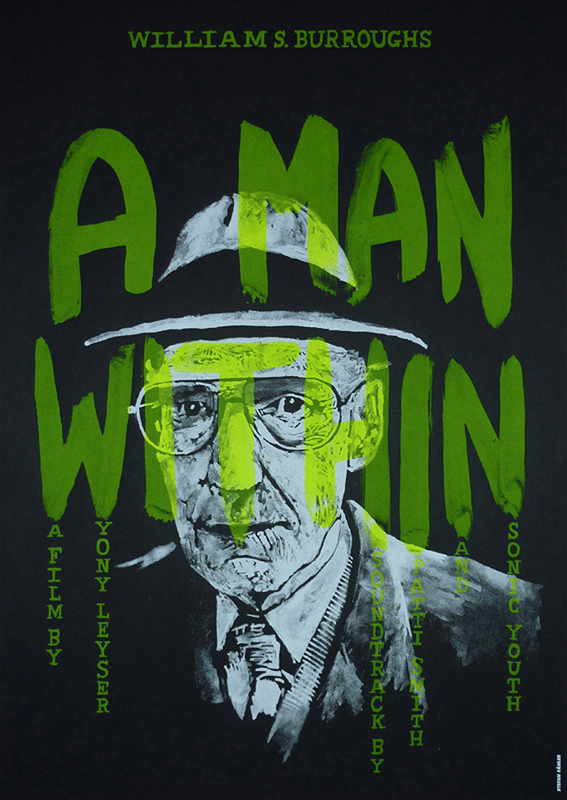
It has such a different mood and application which is great and refreshing. I also find it interesting that this is just a two-color screenprint. It shows how you can push one color’s many tones into an appearance of depth and richness. His work inspired my gig poster for Odesza quite a bit. I also used just two colors but with screens to make them seem like more. I integrated the large type into the composition, albeit in a more rigid and grid-like way.

Stefan also seamlessly integrates photographic images into his work. Here are a couple examples:

lacage_web

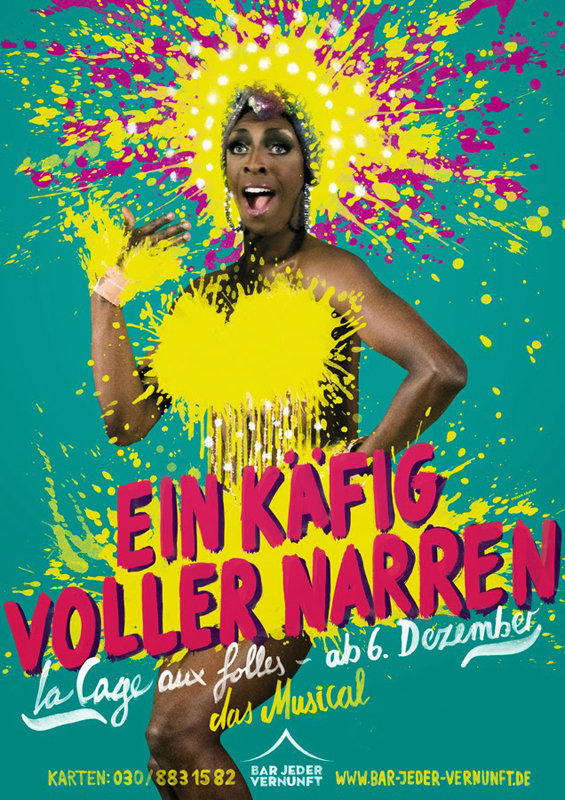
How fun is this musical poster for La Cage aux folles? 

disselma_web
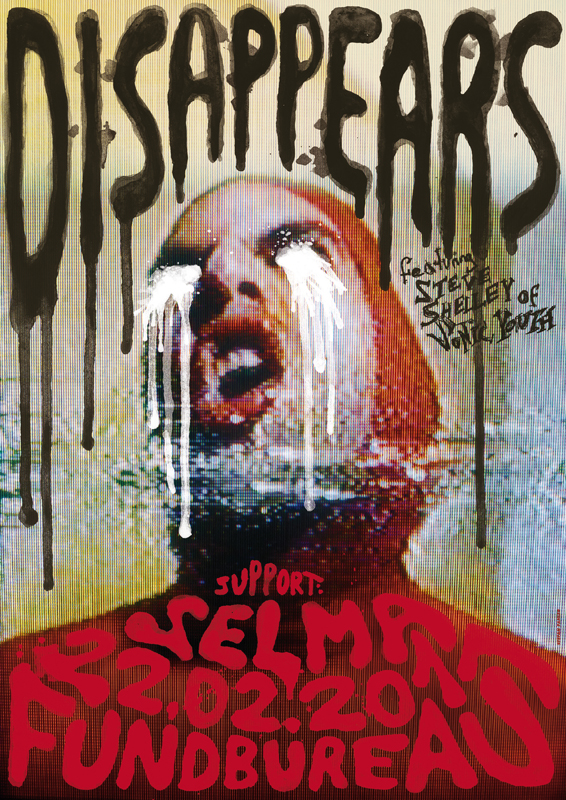
This is obviously a completely different mood and uses a grainy, distorted photo in the background.

His use of pattern is also inventive and beautiful. Here are a couple of examples that use pattern but in very different ways.

wolfeyes_web

sf_mykkiblanco

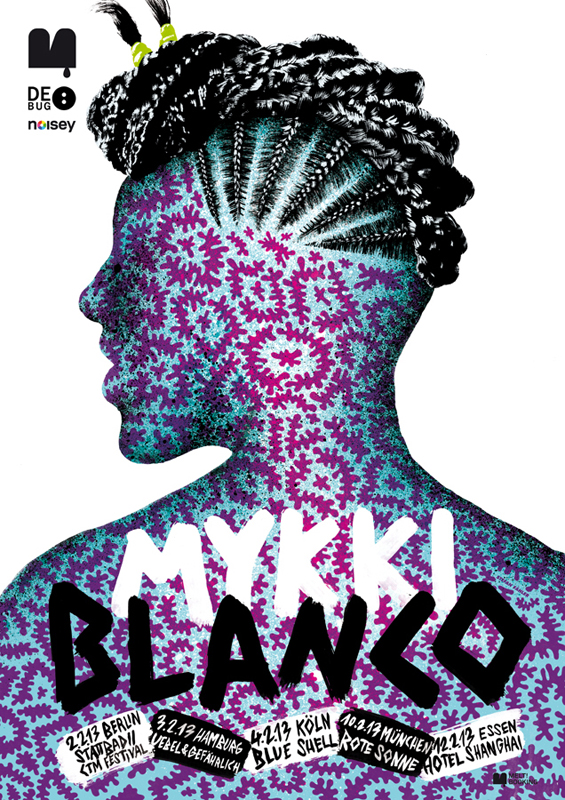
Everything in his compositions are so intentional and bold. His color choices contribute to this as well; they are unexpected and interesting. However I always feel a great artist can still make something eye-catching using just black and white.

crystal_stilts_web
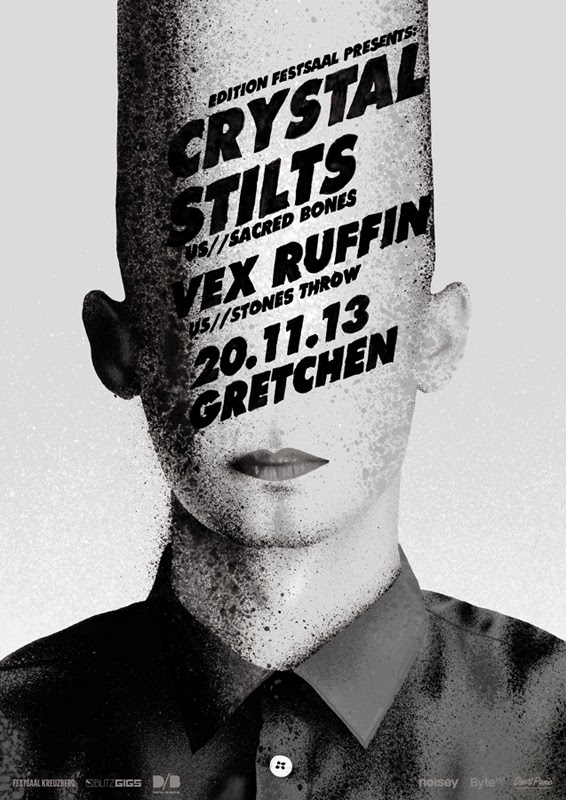
The one shows again his great use of type …on a conehead – awesome! His stippling spray effect works great as the high-contrast dynamic shading.

It was difficult to choose which posters to put in, so check out more of them on his website, where I grabbed the images for this post. They are all wonderfully freaky-deaky. Even more freaky-deaky are his films, providing the imagery of an acid trip without all the pesky brain damage.

Week 6-7: Adding Content

West Seattle Tool Library  A project of Sustainable West SeattleI worked with a photography student, Lou Daprile to shoot the West Seattle Tool Library. She did a great job so I have been adding those photos in. I have been working a lot on this page, and fiddled around a lot with the “Large Selection of Tools” section. I am not getting it to look quite what I had envisioned. So I am taking a step back from that and will create some of the other assets. I started with the 3 steps and made little doodles of each one. This gives that hand-made, approachable feeling. I will do a similar style for the map as well as the donate sections. I am aiming to get the homepage done this week and finish up the other pages the following week.


Week 4-5: Coding Wireframes and Integrating Plugins

These last couple weeks I have coded the long, scrolling wireframe for the homepage. I started with doing it from scratch with underscores, but in the end decided to edit a theme. It has the functionality of the big header image that I wanted.

coded_wireframe_small


I have also been integrating some plugins. One is the stylable Facebook Feed. Another is WooCommerce. WooCommerce is pretty powerful so it will take time to style those pages.

Screen Shot 2015-02-12 at 2.41.51 PM Screen Shot 2015-02-12 at 2.41.41 PMThis week, I will focus more on branding and get that nailed down since I got some feedback from my moodboards. Then I can start making some icons in line with the branding so I can start filling the content.

I am also going to try to combine a Paypal donate button with Contact Form 7. Here is the tutorial. This will be helpful when I display the Donate button, so it will be linked to a name on the WordPress side.

Gouache

I always thought gouache was cheaper watercolor. However I learned recently that it is a thicker version of watercolor. Therefore it covers faster and more opaque, preventing the paper from coming through. This makes it ideal for painting from life and painting “en plein air,” or painting landscapes outdoors.

I like how gouache can be used in so many different ways. The first time I used it was in a fashion drawing class, to quickly render the texture of clothing when painting live models.

Here are a few gouache sketches I did during our drawing time in class:

IMG_1218

IMG_1219In the second one, I was really trying to work with layering. You have to work quickly otherwise it will look too outlined.

Apparently gouache used to be used by comic book artists and poster designers which I thought was a happy coincidence.

Here are a couple very different examples I found on a quick google search:

gouache by Elvgren

gouache by Elvgren

mt-st-helens-gouacheThey have very different applications and textures, but both are still beautiful.

I used gouache and our last poster assignment, which was designing a poster based on a quote for a child’s room. I narrowed the target audience to a child’s room who is under one year old. This was a good place to use gouache. For one, because it is softer and lends itself to an infant’s room better. And another, I thought parents of young children are now so discerning of what they expose their child to, and something that is hand-made is appreciated more now.

First I drew silhouettes of my friends as a reference. That was fun.

IMG_1201 IMG_1200

Then I did a few rounds with gouache. I tried to do a couple layers to give them depths of colors and tints.

IMG_1203

IMG_1202However I did not think it was strong enough to stand on its own so I laid it over a vector illustration of the same design.

flowers_poster copyWoah, colors are crazy off! But you get the point. I also added a background color in indesign in order to activate the negative space a little more.

flowers_posterSo the green is more blue in real life. In any case, I want to keep using gouache, it seems I have barely scratched the surface of what it can do.

Week 4: Bit o Branding

This week I decided to switch gears and focus on branding. They already have a logo and do not want the concept changed, but it needs to be streamlined and tweaked. It also needs a concise color palette and typefaces because they are not solidified.

Here are their previous logos:

logo

main-logo-vectorHere is the logo that I polished a little for a shirt they had produced.

logo draftBut I do think it needs to be simplified.

Hum Creative came in on Monday and they went over some great ways to concept. One that I implemented was to create 3 simple moodboards with different color palettes, photo styles, and typefaces. I came up with the adjectives by doing a brain dump and trying to establish their target audience.

Brain Dump

Brain Dump

Here are the three moodboards:

moodboards-03 moodboards-04 moodboards-02They are rough but still convey 3 distinct moods and feelings. I will run them by Brian and main tool library users to see which one they are leaning towards.


Week 3: Boner Kill

After a particularly deflating week, I finally feel back on track. Instead of trying to organize all of the backend server stuff now, I will wait until it is all nicely designed and then try to migrate it over.

I was able to get a lot of great feedback from the survey I put out. Here are some of the results:

survey-response

Some unexpected conclusions I made from this survey is that many people use the “inventory” page that has over 1,000 tools and is not easy to find tools on. I assumed because it was so terrible to use that nobody was using it but it seems people will carry out a task if they are determined enough. So I will design the inventory page even though in actuality it make not be able to look like that.

It seems that the functionality of the site is not so much the problem as is more the hierarchy of information. So I will instead use this as an opportunity to bring in more users and urge them to donate. Donations are a big part of keeping the Tool Library alive and it is not very easy to do this on the current site. I will also add an area to buy their shirts since that is another way to get funds.

I started wireframing, keeping in mind existing users who want easy access to the tool inventory and new users who want to learn more about the Tool Library.

IMG_1127

IMG_1128 2

IMG_1126

Here is the more finalized wireframe for the homepage. The yellow squares are photographs and the blue are vector illustrations, like simple logos.

wireframes-01I am little behind on my schedule but I made a lot of progress and will be able to catch up.


Week 2: Research and Survey

This week, I gained insight on the needs of the website by talking to the manager (who is also my boyfriend). There are a few parts of the website that are problematic and features that could be added. My aim is to reduce the number of phone calls and emails so that the Brian’s time could be better used. So I determined the main topics people contacted him about.

  1. Hours. This one is the most obvious, as most people visiting the site just want to be able to see the hours that they are open. I will make this big and and the top of the page so it is very easy to find.
  2. Available Tools. This one is a bit more difficult. myTurn is an open source program many tool libraries use, but it was created specifically for the West Seattle Tool Library. It is through this program that the inventory of the tools is displayed on the website. I may not be able to fix this issue, but hopefully can implement easy fixes such as a better search bar for people who are looking for a specific tool, and featuring the categories of tools rather than the 100 pages of individual tools.
  3. Membership. You can sign up for a membership online, however it is a 2-step process that nobody ever does. This could be better displayed and organized. If more people sign up for a membership online, this would save quite a bit of time for Brian during Tool Library hours.
  4. Gift Membership/Donation. Currently, you can buy a gift membership for someone or donate money to the Tool Library through Paypal. The problem is that when people buy a gift membership, they receive nothing and Brian receives no confirmation, so there is no prove that they bought it for someone. This is similar to donating through Paypal. One way I was brainstorming to solve this is to create a WooCommerce store. A gift membership or donation could be products in the store, and then they receive some sort of PDF or email. Also, Brian would be able to see purchases in WordPress or perhaps he could get a confirmation email. Another part we can add is to be able to buy merchandise through this store, since they have shirts that are already printed. And yet another part is that they are starting to refurbish and then sell tools for the shop. This could be integrated here if they like, or they could use their existing method of just selling through craigslist.
  5. Email. The issue above reminded me that Brian does not have a legitimate email address through their domain. When I get access to their server, I can hopefully set that up for him.

I did a sitemap of the existing website. It’s not beautiful, but it gets the job done.

Screen Shot 2015-01-15 at 1.33.10 PMI also made a survey that the Tool Library will be sending out to all of their users. Within a week, hopefully I can draw some meaningful conclusions from it.

So armed with these three resources, I will make an updated sitemap this week, which can of course change depending on new or changing information. I can then start wireframing and making a moodboard. This will give me and the client a better idea of what I will be designing, plus I can solidify their branding.

© 2024 Seana's blog. All rights reserved.

Theme by Anders Norén.